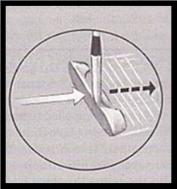
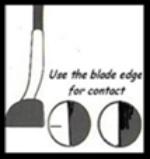
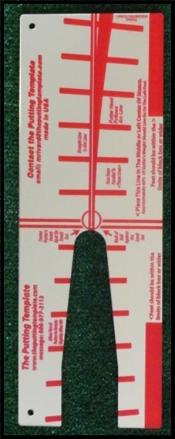
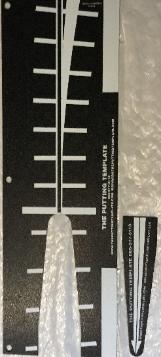
I based The Putting Template on an arc style-putting stroke, not straight back and straight through. When you use the Template, visually, you see the correct stroke; mentally, you get feedback watching the ball roll where aimed; and physically, you learn to rely on connections between the body and arms that produce a good putt. --Aim is the number on reason golfers miss putts. Put the AIM CHECKER against the putter face of other golfers (see picture on page 1). Probably half aim left on the short ones and right on the longer ones. I find the best way to aim correctly is to find a point about 4” in front of the ball and aim at it. The 8” chute on the cup side of the template allows only ¼” clearance on either side of the ball and trains golfers to focus on hitting it through the chute. Set the template up using either the AIM checker or a plumb bob method to check the template aims where you want, then peg the template with golf tees so it stays lined to the target. .---Missing the putter’s sweet spot is the second reason for missing putts. The sweet spot is normally in the near center of the putter face and most putters mark this spot with a line or dot. Toe hits start to the right and heel hits start the ball to the left of the intended target. If the ball does not cleanly come out of chute, it will most likely be due to missing the sweet spot. The putting template’s design helps the golfer address the ball on the putter’s sweet spot. (See the arrows on the template) Most golfers’ obtuse downward view of the ball causes them to think they are lining up the sweet spot correctly. The correct hit against the equator of the ball feels so when the “left wrist, thumb and little finger of the left hand resist” the right hand at impact. This correct feeling will result in a turn or release of the toe toward the target. Hold the finish, miss or make, look down at the putter head to see if it lines up with the hash marks above and below the chute. The left hand resisting facilitates the release and sometimes the correct hit feels like a slight pull. Hitting the equator of the ball with the blade edge insures the ball rolls immediately but by hitting the center of the face on the equator, there is a good chance the loft of the putter may get the ball airborne causing a slight bounce (video with an iPhone slow-mo can show this). ---An un-square putter face is the third reason a putt misses. The Putting Template’s stroke path arc represents a natural path that teaches the golfer to bring the face back square every time. The hash marks indicate the face position thru the phases of the stroke. Hash marks on the arc in both directions teach the golfer to understand the natural stroke and find the sweet spot with a square face. If the golfer is the correct distance from the template (10") his elbows touch his stomach/rib cage, the wrists are more up than down at address, head an eyes more or less over the ball and during the stroke focuses on a center point in the chest, it is much easier to use a shoulder(large muscle) stroke. The grip pressure is “one” on a scale of 1-10 and weight is more on the left foot because your eyes should be over the ball. The major controller in the grip is a A LITTLE PRESSURE IN THE LEFT PINKY FINGER HOLDING THE GRIP WHILE THE RIGHT HAND AND SHOULDER PUSH THE PUTTER AGAINST THAT RESISTING PINKY. BUT YOU MUST YOU HIT THE BALL CRISPLY TO GET IT TO ROLL CORRECTLY. Watch the hit on the equator of the ball (see the picture left), the blade will stay square. Using this technique, you will not have any trouble keeping the face square to the arc and hash marks-NOT THE STRAIGHT AIM LINE. If you purchased the mirror template, place your eyes over the ball and you will immediately notice that the line you want is much more visible. Not all good putters agree on “eyes over the ball”. Some do and some do not. Using a clear template, the golfer can drop a ball from their nose when set up. If the ball hits the ball on the ground, his eyes are over the ball. It is important to keep your feet approximately 8” -10” from the edge of the template or about 12” from the aim line to insure the putter does not go outside the line on the way back. You may find that your putter needs to be longer or shorter. The template represents the path that a putter should take when it is ‘powered’ by the large muscles above waist. Large muscle areas are stomach, rib cage, chest, and shoulders. The elbows are the connectors. For the large muscles to control the stroke, both elbows should be “connected to the more front portion” or touch the stomach and rib cage throughout the entire stroke. This connection promotes a shoulder, once piece stroke. We have all heard of the dreaded chicken wing in the full swing, but I think it is a more dreaded device during the putting stroke. When the left elbow loses its connection on the forward stroke, the face will open. If the right elbow comes out, the face closes. If either elbow moves during the forward stroke, the face of the putter moves. Putting Green Drill #1 Find a relatively flat putting surface that is straight and place the template about 18” -24” from the cup aiming the template centerline to the center of the cup or Adjust your aim accordingly if you cannot find a straight putt. The template will move if bumped, so to keep the template in place, secure the template with golf tees in the 2 holes provided. --Take the recommended address position. --Aim the logo or if you like to have a line on your golf ball, aim directly in line with the centerline of the template and the center of the cup or adjusted line if a breaking putt. --After address, look at the center of the hole and the back lip of the hole for a moment. Then look back at a dimple or inked spot on the ball and execute the previously discussed stroke mechanics. Practice hitting or tapping the ball into the back lip of the hole. Always hit short putts into the back of the cup, unless they are downhill. --After each putt, glance down at the putter face and see if the top edge of the putter lines up with the lines that are above and below the cutout section of the left side of the template. Notice that the putter face must turn slightly or “release” much the same as a golf club does thru a normal shot. Putts end up right of the hole without the small rotation of the putter head and left if the ball is too far forward. Putting Green Drill #2 Using the drill above, extend the distance 3, 4, 6, & 10’. Hit these putts the speed with which you are comfortable. Also, use this practice on downhill putts. |
Double Click on Videos For Full Screen Aimed At Cup--Blade Edge Hit Putterhead Follows Arc Plays Best in Media Player |
Please Read these directions carefully and regularly, learn why the template works and the best way to utilize it. If you follow these suggestions on a regular basis, your putting will improve. The template and the instructions are based on sound principals that do work. THE PUTTING TEMPLATE INSTRUCTIONAL MANUAL From the Inventor: Mark R Rivard Email For Help |
Clear Template
Black Template
| Mirror Template |